Spellcheck menu

Here’s a script that jumps the caret to the closest misspelled word in the current segment (in the direction towards the beginning of the target text) and brings up the context menu that you usually get on a misspelled word. It allows to correct, add, or ignore misspelled words in the current segment without using the mouse or pressing arrows to move the caret to the required position in the text. If you’re familiar with Alt+F7 in MS Word, you get the idea. The script should be assigned to one of the 12 available script slots, and then it can be run by pressing Ctrl+Shift+Fn. If Alt+F7 in MS Word is something that you use often, it makes sense to assign it to the slot 7 and run it with Ctrl+Shift+7 to make it easier to remember.

Context menu with spelling suggestions called by the script

As usual, the script can be downloaded from two locations:

Any comments or suggestions are always welcome. If you find it useful, there’s an easy way to say thank you.

Launching external apps and scripts from #OmegaT

OmegaT can launch external programs and scripts and pass certain project-specific data as parameters, and this is quite useful.
There are three ways to do this:

  1. External searches (global or project specific)
  2. Post-processing commands (global or project specific)
  3. OmegaT scripts

External searches can pass the text selected in OmegaT’s editor to the web browser as a URL to open. Such URLs consist of a fixed part (e.g. https://en.wikipedia.org/wiki/) and the selected text inserted somewhere in the URL instead of the placeholder ({target} in the External Search configuration). It’s also possible to open any other program instead of a web browser. This makes sense if the program you want to run is a dictionary application or other reference software that can accept parameters from standard input. An excellent example of such software is Goldendict.
What this approach lacks is the capability to pass other useful information, such as project languages or file locations. Not a big problem, especially if you are translating from one or two languages. But even with two, if you want to use a multilingual resource, it becomes necessary to create a separate external searches for each language, though the difference often is just a language code. There are ways to work around this limitation, but I’ll perhaps discuss that another time.

Post-processing commands have a much bigger list of supported variables, and they are great for tasks like file format conversion or live preview. Despite their versatility, these commands cannot receive input directly from OmegaT’s editor. Moreover, they only execute when generating target files, making them less suitable for tasks like lookups or note-taking that may need to be performed multiple times even while working on a single segment.

With OmegaT scripts it’s possible to execute an external application and pass almost anything related to the project: source and target text of the current segment, selection in the editor, paths to the various files in the project that OmegaT is aware of, project languages along with their country variants, current file, and more.
Years ago I did write a script exactly for that purpose, and I think it was my very first script in Groovy. It’s quite straightforward: it only collects a whole bunch of variables and passes them to an external script or app that can decide how to handle them. That external part was written with Linux in mind. GNU/Linux readily provides Bash shell (or a number of other shells to chose from) that makes it possible to combine multiple components into a practical routine tailored to specific requirements, and Zenity, a handy utility that simplifies the creation of basic GUI dialog windows for seamless interaction with Bash scripts. The concept was very simple: OmegaT gets all the needed variables and launches my Bash+Zenity script. This script, in turn, presents a list of various actions, and once a choice is made, the corresponding action is executed. It worked beautifully (at least according to my definition of beauty). Over time, the list of actions expanded, and I relied on it daily.
Recently I switched to macOS, and at first those thing were badly missed while working in OmegaT. But it turned out that Zenity is available through Homebrew, while Bash is already available out of the box. Thus, the only task remaining was making sure my old creation is compatible with both operating systems.

So here I present that combination now working equally well on Linux and macOS.

Nota bene:

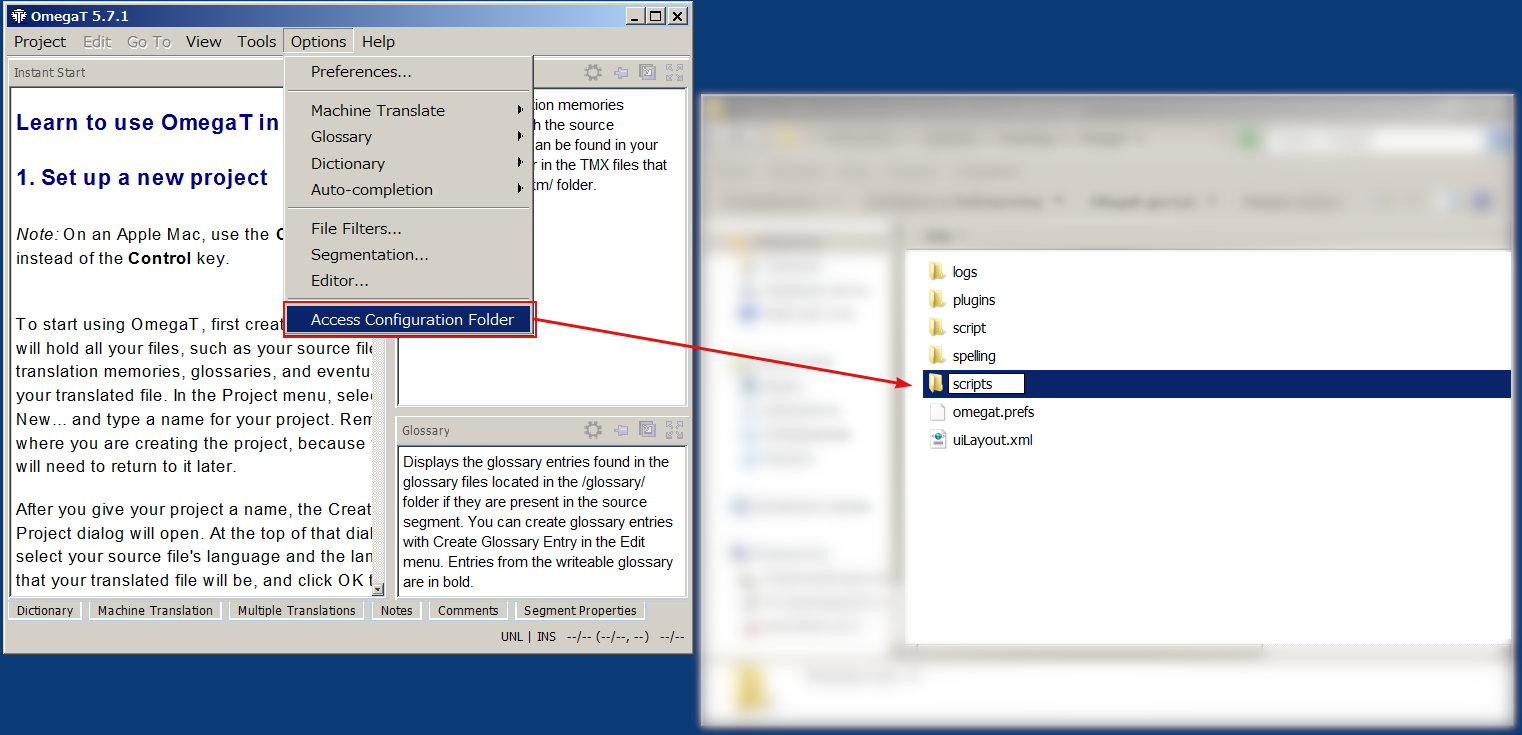
  • <omegat_config> below refers to OmegaT configuration folder. You can access it by pressing OptionsAccess Configuration Folder in OmegaT.

  • If the window called Scripting that pops up by pressing ToolsScripting is empty for some reason, you may want to go to <omegat_config> and create a folder called scripts there (note the plural).
    Then in the Scripting window, click FileSet Scripts Folder…, and select the newly created folder (under Linux and Mac, you can simply drag the folder onto buttons in the file chooser, and that folder will be selected automatically)

  • Any new scripts should be placed into this folder. If you need any of the scripts bundled with OmegaT (there are a few useful ones), copy them over from where OmegaT is installed (OmegaT.app/Contents/Java/scripts on Mac)

So, here we go:

  1. Add the Groovy script to your OmegaT scripts.
    • The script is called utils_external_opener.groovy, and it can be downloaded here and here.
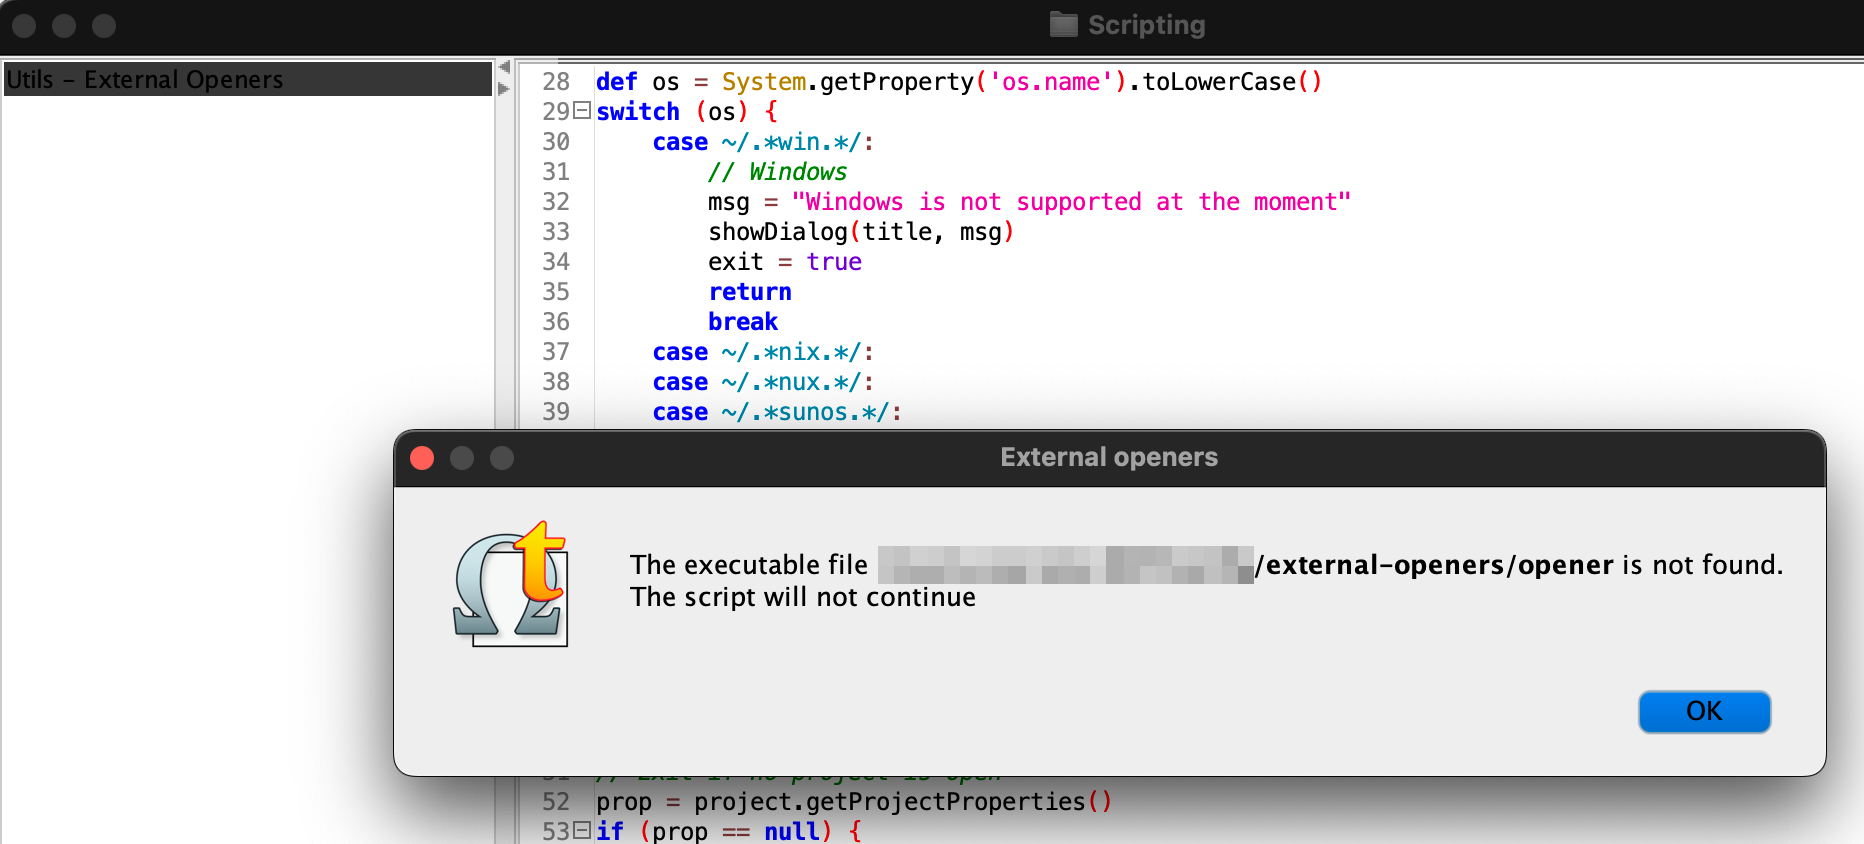
    • The script expects an executable called opener to be located in folder <omegat_config>/external-openers/. It will not continue if neither that folder, nor the executable is found. See p. 2 for details about that external part.
    • When the groovy script is successfully run, it creates a file called opener.vars in <omegat_config>/external-openers/. It is a plain text file containing the collected variables in this simple format:
      variable='value'
    • The script then executes <omegat_config>/external-openers/opener and passes the location of the opener.vars to it.
  2. Copy my opener to <omegat_config>/external-openers/
    • To do so, download the zip file containing the external launcher from here or here.
      Place the zip inside <omegat_config> and unpack there. It will create <omegat_config>/external-openers with the file opener. After that, the zip file can be deleted.
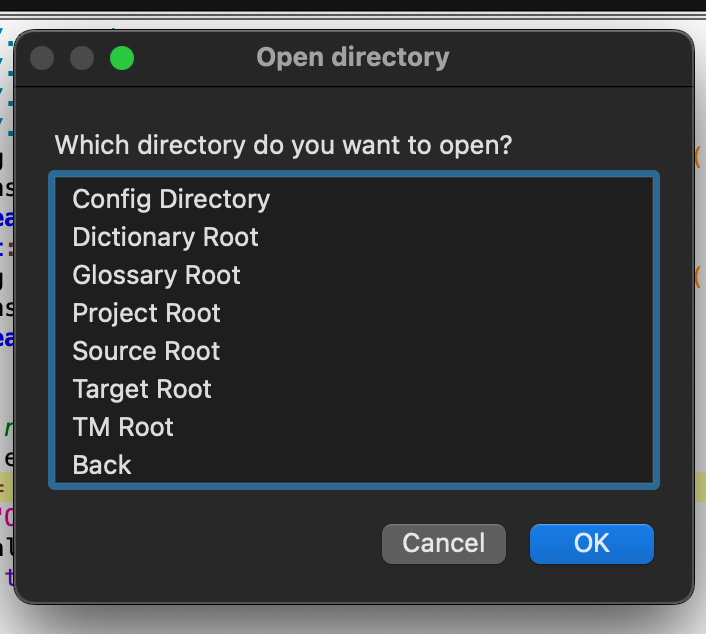
    • opener is a Bash script that doesn’t do anything useful on it’s own. It simply lists everything it finds in <omegat_config>/external-openers/actions/ via a selection list dialog (if you used the zip file, the subfolder actions/ and its contents were added too). Once the selection is made, the selected item is executed. Items under <omegat_config>/external-openers/actions/ can be scripts written in various scripting languages (as long as your OS knows how to execute them), or compiled binaries, but not application bundles.
    • I offer three such action scripts: “Open Directories”, “Rename target files”, and “Web Lookup”. “Rename target files” asks several questions when it’s executed, the other two present further list (but that’s as far as the lists go in the bundle I here present). The Web Lookup works with the selected text, or, if no selection is made, with current segment’s source text. Wikipedia languages, and DeepL and Google language pairs are taken from the current project language settings.
    • Make sure that <omegat_config>/external-openers/opener and everything under <omegat_config>/external-openers/actions/ is set to be executable.
  3. Make sure Zenity is installed.
    • On macOS, you may need to enable Homebrew and install Zenity with
      brew install ncruces/tap/zenity
      (this is a Zenity rewrite that doesn’t depend on GTK+; I haven’t checked the GTK+ version available through Homebrew and Macports.)
    • On Linux, Zenity is most likely already installed, but if not, just install it using your package manager.
  4. There’s Bash and Zenity for Windows, but there’s no time whatsoever to make sure this setup runs on Windows too. If anyone is interested to check and adapt it as needed, I’ll be happy to incorporate their findings.
  5. The script described here makes the following OmegaT info accessible to the external opener:
    • selected text (if nothing selected, the current segment’s source will be used)
    • URL-encoded selected text
    • current segment’s target
    • URL-encoded target
    • current segment source
    • URL-encoded source
    • project’s path
    • path to the omegat subfolder of the current project
    • path to the current project source folder
    • path to the current project target folder
    • path to the current project tm folder
    • path to the current project glossaries folder
    • path to the current project dictionaries folder
    • path to the current file open in the editor
    • path to the writable glossary
    • path to the OmegaT configuration folder
    • path to the OmegaT scripts folder
    • source language code
    • target language code
    • source language country variant
    • target language country variant
    • source language name
    • target language
    • language in which OmegaT is run

If you have questions, you can always leave them in comments. Happy translating!

Merge and split segments in OmegaT (update)

OmegaT script for merging and splitting segments has gotten a few improvements:

  • It can show the text to be split or merged with or without tags
  • If tags are to be shown, they can be formatted with a different font color and size to make the actual text more readable
  • If a split is attempted while text cursor is inside a tag, the script won’t add a rule and will inform the user about it
  • The preview of the split or merge to be performed now has horizontal borders to make it easier to see the possible result

So, these are the options that can be configured by the user:

enforceProjectSRX   = true   //if true, the script will make sure project-specific segmentation is enabled
separateMappingRule = true   //if true, the script will add a separate group for its rules
showTags            = true   //if false, tags won't be shown in the confirmation message
paintTags           = true   //if true, tags will be shown in different font size and color
tagColor            = "gray" //tag color
tagSize             = 1      //tag size

Comments in those lines should make it pretty clear what option does what. To change an option, go to Tools → Scripting…, then in the list of scripts, select Merge or split segments. In the text area on the right part of the screen, scroll down a bit (to about line 30), find the option you want to change, edit it, press Ctrl+S to save, and run the script.

The script is available on GitHub and FS.net

If you need more info about installing and using OmegaT scripts, see this quick guide.

If you find this script useful, leave a comment.

There’s also a very easy way to say thank you.
Your support will make more scripts like this possible.

Happy merging and splitting!

Scripts in OmegaT (quick guide)

A quick and easy intro to OmegaT scripts:

  1. OmegaT comes bundled with several scripts. Some of them are of little practical use as they are included as examples for users willing to write their own scripts.
  2. The bundled scripts are located in scripts subfolder of the folder where OmegaT is installed. Often the installation is done in a location where a regular user doesn’t have write permissions, which means adding and removing scripts can be complicated.
  3. Luckily, OmegaT permits setting an arbitrary location for scripts. Do that! It can be any location where you can write to. It doesn’t matter if it contains no scripts at the moment: you can add only the ones you need, and only as you need them.
    It makes sense to place the scripts folder into the OmegaT config folder (the folder where OmegaT stores its settings) just for convenience.

    But it can, of course, be any other folder.
  4. Copy the scripts you need to the folder that was set for scripts.
    If you’re downloading from GitHub, you might need to show the desired script in raw format, and then save the page. If it saves as filename.groovy.txt, just remove the .txt part. If the file got saved in your Downloads folder, just move it into the folder set for your scripts.
  5. In OmegaT, open Tools → Scripting, in the newly open Scripting window select the script you need (left part of the window) and hit Run (lower left corner).
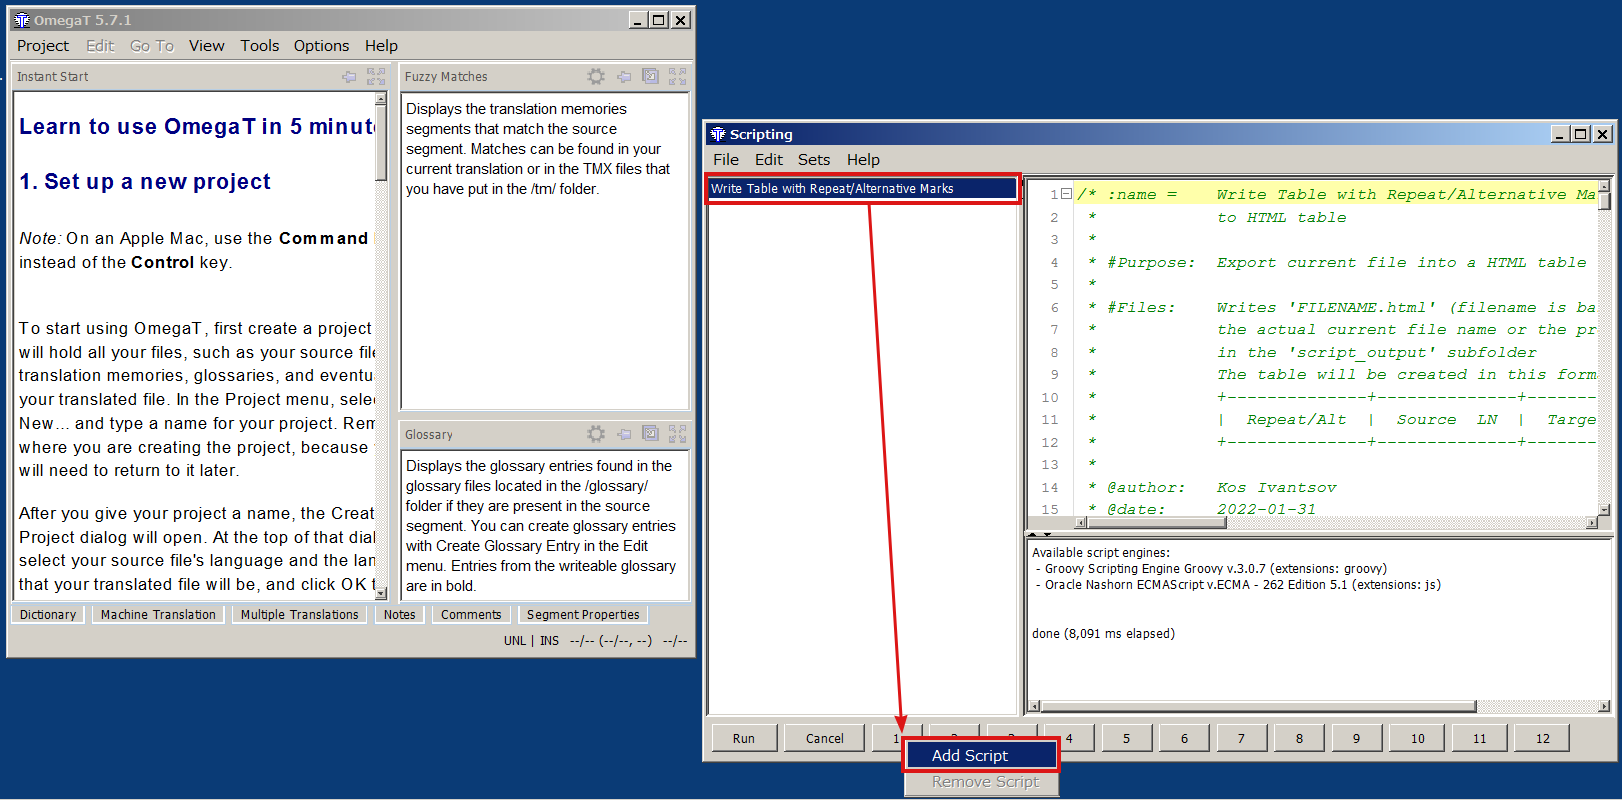
  6. If you need to run a script quite often, there is a way to assign shortcuts to up to 12 scripts:
    Select the script you want to run with a shortcut
    Right-click on one of the 12 buttons in the lower part of the Scripting window
    Select “Add Script”
  7. The script thus installed is available under Tools, or can be run by pressing Control+Shift+Fn (Fn is a function key at the top of the keyboard, n is a number between 1 and 12, and the number on the button in the Scripting window corresponds to the number on the function key)

Select Source Text in #OmegaT

There might be a number of situations when the whole text of the current segment’s source is needed for something other than translation itself: performing concordance or web search, writing a translation note in another application, asking your client or project manager about the text, etc.

Currently, in OmegaT it can be achieved in several fairly easy ways:

  • Selecting the text with the mouse (but who wants to do that?)
  • Inserting the source text into the target area (Ctrl+Shift+I or Ctrl+Shift+R) and selecting the text there
  • Unlocking the text caret with F2, and then using arrow buttons and Shift to select the text
    (If you want to have the caret unlocked by default when you start OmegaT, there’s a way to do it)

All that is fine, but it would be much nicer to have a simple shortcut to select that source text, similar to what Ctrl+A does (which in OmegaT Editor selects everything only in the target field, or the complete textual contents of other panes if the got focus). I’ve written a simple script that does just that, and though scripts can be bound only to Ctrl+Shift+F[1-12] keys, it’s better than not having a shortcut at all. Hopefully, this function might appear in OmegaT itself, but before it happened, here you have it:
Get it from SF.net
Get it from GitHub

To learn how to install and use OmegaT scripts, see this quick guide.

Happy selecting!

Export #OmegaT Project to Excel (UPDATE)

The earlier version of this script was described in this article. Here I’m announcing the update to the script which makes it possible to include:

  • Segment ID for each segment (applicable only for some file types)
  • Translator’s ID of the segment’s translation creator
  • Translator’s ID of the segment’s translation editor
  • Segment notes
  • Visual marks to show segments’ uniqueness or repetitions (grayish background, marks 1 or + in the dedicated column: for the first occurrence, or further instances of the repeated segment, respectfully)
  • Visual marks for alternative translations (different font color, mark a with a different background in the dedicated column)
  • Visual marks for untranslated segments (mark NT in the dedicated column)
  • Visual marks for paragraph boundaries (upper border over the source and target text which visually groups the text belonging to the same paragraph)

All of the above features are optional, though they are on by default. To disable or change them, editing the script is required, but all those lines are very easy to understand, they have comments, and are placed almost in the very beginning of the script:

Scripting window with the script options in focus

Unlike the earlier version, the script produces the tabular output:

Segment #Source TextTarget TextUniq/AlSegment IDCreatorChangerNote

The script can be downloaded from
SF.net repository
GitHub repository

To learn how to install and use OmegaT scripts, see this quick guide.

Comments, suggestions, complaints, and donations are always welcome!

Happy spreadsheeting!

Export OmegaT project to an HTML table

A few years ago I wrote a script that exported the whole OmegaT to an HTML table. I used it a lot myself, and I know quite a few other people found it helpful too. The problem with the table produced by that script was that it had no way to show repeated or alternatively translated segments. I’ve rewritten the script since, but never published an announcement about that new version. Now I did a few more changes, and thought that it’s about time to fix that omission.

Continue reading

#OmegaT Merge/Split script updated

These days I often get jobs in IDML format. Luckily such files can be translated in OmegaT either with the Okapi filters plugin, or, if the files are not so plain and simple, by creating an OmegaT project in Okapi Rainbow. But it’s somewhat beyond the point. The point is that with these files the wonderful script to merge and split segments wasn’t working, at least for merging.
As you’ve rightly guessed, this tiny post is to inform you that it has been fixed, and the updated script could be downloaded from the SF.net repository.

December 2022 update: The updated merge and split script is described here.

To learn how to install and use OmegaT scripts, see this quick guide.

Happy merging and splitting, fellow OmegaTers!